Continuous Data Loading Made Simple with Snowflake’s Snowpipe
Struggling with clunky data pipelines that sap time and focus? Snowpipe offers a simpler path for continuous data loading.
This magical Snowflake service automatically detects new data in S3 and loads it into Snowflake tables in real-time. No code required – just set it and forget it. Snowpipe handles constant sync behind the scenes, so your tables always have the latest data.
Wave goodbye to cumbersome ETL routines. Snowpipe’s simplicity lets you redirect energy towards analysis and away from pipeline maintenance.
Read on to unlock the secrets of seamless, hands-free, continuous data loading with Snowpipe.
Introduction to Data Loading
What is Data Loading?
Data loading is the process of transferring data from various sources into a data storage system, such as a database or data warehouse. It is a fundamental step in data management and analysis.
Importance of Data Loading
Efficient data loading is crucial for organizations aiming to make informed decisions, extract valuable insights, and gain a competitive edge. It ensures that data is readily available for analytics, reporting, and business intelligence.
Continuous Data Loading in Snowflake
Continuous loading, often referred to as continuous data integration, is a data loading process that continuously ingests and updates data into a destination system in real-time or near-real-time. Continuous loading is used to keep data in the destination system synchronized with changes in the source data, providing up-to-date and accurate information for analysis, reporting, and decision-making.
What is a Snowflake Snowpipe?
‘’Snowpipe’’ is a built-in service provided by Snowflake for achieving continuous data loading from external stages into Snowflake tables. It’s designed to automate and streamline the process of ingesting data from sources, such as cloud-based storage solutions like Amazon S3, Azure Data Lake Storage, or Google Cloud Storage.
let’s explore how Snowpipe works and how you can achieve continuous data loading with Snowpipe through a demonstration using AWS S3.
Create an External Stage:
In Snowflake, you first need to create an external stage that points to your S3 bucket. This stage defines the location from which Snowpipe will ingest data.
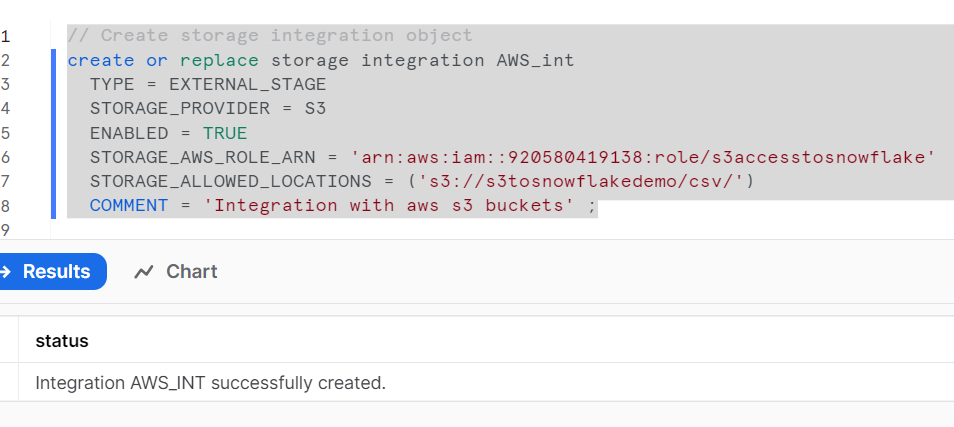

The provided SQL code creates a storage integration named `AWS_int` in Snowflake. Storage integrations in Snowflake are used to connect Snowflake to external cloud-based storage systems. In this case, the storage integration is specifically configured to work with Amazon S3 as the storage provider.
CREATE OR REPLACE STORAGE INTEGRATION AWS_int: This line initiates the creation of a storage integration named `AWS_int`. If a storage integration with the same name already exists, it will be replaced with the new definition (hence the `OR REPLACE` clause).
TYPE = EXTERNAL_STAGE: This line specifies the type of storage integration. In this case, it’s set to `EXTERNAL_STAGE`, indicating that it will be used to connect to external cloud storage stages.
STORAGE_PROVIDER = S3: Here, you specify that the external storage provider is Amazon S3. This means that the storage integration is configured to work with Amazon S3 as the external storage system.
ENABLED = TRUE: This line enables the storage integration, allowing it to be used for data integration with the specified storage provider.
STORAGE_AWS_ROLE_ARN = ‘arn:aws:iam::920580419138:role/s3accesstosnowflake’`: This is the Amazon Resource Name (ARN) of an AWS IAM role that is used for authentication and access to Amazon S3. The role `s3accesstosnowflake` is associated with the specified AWS account. It grants permissions for Snowflake to access data in the specified S3 bucket.
STORAGE_ALLOWED_LOCATIONS = (‘s3://s3tosnowflakedemo/csv/’)`: This specifies the allowed locations or S3 buckets and paths that can be accessed by Snowflake using this storage integration. In this example, the integration is allowed to access the `s3tosnowflakedemo` bucket with the `csv/` path within it.
COMMENT = ‘Integration with AWS S3 buckets’`: This is an optional comment that provides a description of the purpose of the storage integration.
In summary, this code creates a storage integration named `AWS_int` that is configured to work with Amazon S3. It specifies the IAM role for authentication, the allowed S3 locations, and enables the integration for data integration between Snowflake and the specified S3 bucket and path. This integration will enable Snowflake to interact with the specified S3 data for data loading and other operations.
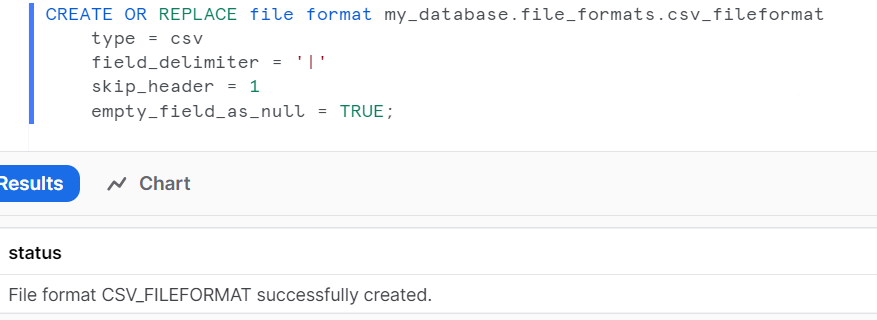
Create a File Format:
Define a file format that specifies how the data in your files is formatted. This is used to interpret the data when ingested.
Create an Integration:
An integration is used to connect your Snowflake account with your AWS S3 bucket.
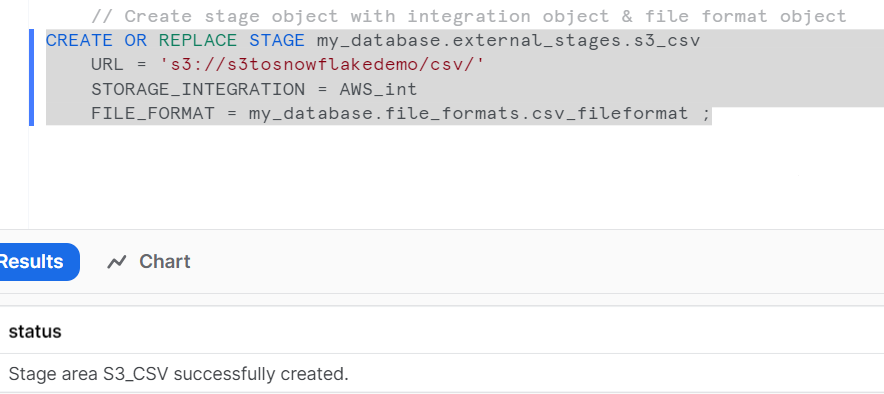
We can check the files available in stage area with below code

This stage is configured to access data stored in an Amazon S3 bucket and utilizes a storage integration for authentication and a predefined file format for parsing the data.
Create a table to load files:

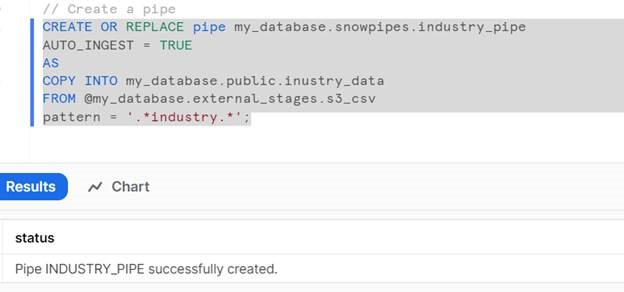
Create a snowpipe :
DESC pipe employee_pipe;
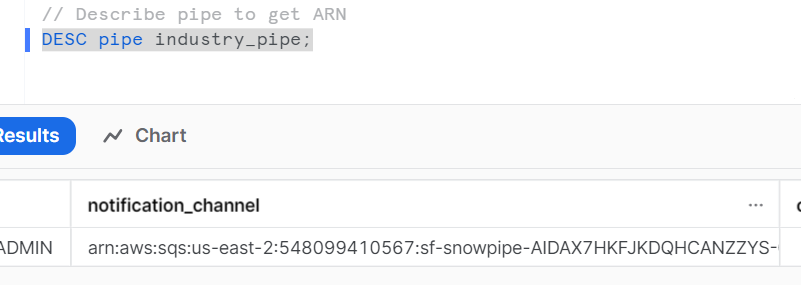

Once you have the Notification Channel ARN, you can use it to configure event notifications for an SQS queue. You’ll need to set up an AWS EventBridge rule or an S3 event notification to trigger events when data is delivered to the Notification Channel.
Let’s verify the table.
select * from my_database.public.inustry_data;

Conclusion:
With these configurations in place, whenever a new file is added to the specified S3 bucket (s3://s3tosnowflakedemo/csv/), the Snowpipe will automatically detect the addition. The Snowpipe will then load the data from the new file into the Snowflake table using the defined external stage and file format. Simultaneously, event notifications on the SQS queue will be triggered, providing a means of external notification or integration with other systems when data is loaded.
This setup ensures a seamless, near-real-time data loading process from your S3 bucket to your Snowflake table, allowing for automatic updates as new files arrive. The event notifications further enhance the system by enabling external systems to be aware of and respond to the data loading events in Snowflake.


